lol, I have no idea if anyone sells a waterblock for a ddc, as if you wanted water cooled pumps you would usually run a D5.Wouldn't the big brain move be watercooling the pumps?
You are using an out of date browser. It may not display this or other websites correctly.
You should upgrade or use an alternative browser.
You should upgrade or use an alternative browser.
The Z Build(s) 3.0 - Go Big and/or Go Home
- Thread starter Zarathustra
- Start date
Zarathustra
Cloudless
- Joined
- Jun 19, 2019
- Messages
- 4,407
- Reaction score
- 4,753
Hehe, maybe some dayI love how those look on the side of the rack! If you ever need more cooling, you could rotate the rack and put 2 more on the other side
A question for you - you’re planning multiple pumps and reservoirs but I’m not 100% sure where you are planning on mounting them. Have you considered using another 3U case and putting most / all the pumps in that case? If you’re going for DDC pumps, that would likely give you plenty of space to mount them and also to arrange for dedicated airflow to cool them.
The two pumps used for the radiators will hang right underneath the reservoirs, which will hang on the side of the radiators.
The plan originally was to get some sort of plastic "hobby box" to install the PSU and Aquaero devices in, bolt that to the side of the case next to the radiators, and then mount the three additional pumps for the systems on top of it.
That worked in my head before I started measuring, but with the size of these radiators, that is obviously not going to fit. There is no space left next to the radiators (unless I go all the way down to the floor underneath them, but I don't want to do that).
The current revised plan in my head is to buy a large-ish PVC junction box from the electrical aisle at Home Depot. Something like this:
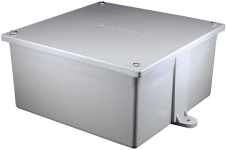
I could then use the C-channel metal bars left over from my initial failed plans (in previous posts) and attach those across the rear rails of the rack, and bolt this box to those bars.
It then attach the three remaining pumps to the lid of this thing. I think with the DDC's exposed to open air, they won't need much in the way of airflow over them to keep them cool, especially with all of the air moving near those radiators.
I'll of course have to cut some holes for ventilation, but I think it will wind up being pretty good.
As an added bonus, I could use actual electrical liquid-tight flexible conduit to route all of my wiring (power, fan speed control, pump speed control, etc.) for a nice clean look that aids in cable management.
At least that is my current thinking until I have a better idea.
Wouldn't the big brain move be watercooling the pumps?
So, I have always used D5 pumps, and by design they cool themselves with the fluid that passes through them, dumping it into the loop, but with like 22-25W each, we are talking like 125W if they are all at full speed. That's a not insignificant amount of added heat load to the loop.
Yes, these radiators are large and overkill, but I still want as much as possible of that capacity going towards cooling my components, not towards cooling my pumps.
There is little to no downside just having pumps that are air cooled avoiding dumping heat into the loop, and that's the reason for going with some DDC's.
DDC's have much lower flow rates than D5's though, so I figured, I'll use DDC's where flow rate is not likely to be critical (radiators and workstation) and keep D5's for where I really care about flow rate (CPU and GPU blocks for the game machine)
Zarathustra
Cloudless
- Joined
- Jun 19, 2019
- Messages
- 4,407
- Reaction score
- 4,753
Well, it took all night, but I got the rack rearranged, holes drilled for the second radiator, mounting brackets mounted, and radiators test fitted.
I had almost forgotten how much of a pain in the *** cage nuts can be.
Almost.
View attachment 3550
I wonder if that's enough radiator capacity. Might need to add some more?
Anyway, this took all night, and we are getting a whole lot of snow tonight, so I am going to be shoveling tomorrow.
Probably won't make much more progress on the project this weekend.
Oh, and worth noting, I did go with the middle configuration from my spreadsheet screenshot above, but - obviously - the workstation and game box are not in there yet.
It looks like my concerns about eight distribution and stability were unfounded. The thing is still completely stable, even with two heavy UPS:es midway up, and a heavy 4U server above that and big empty spaces in the lower half of the rack.
The only pump I’ve ever burned out is a DDC. I had one in a swiftech bayrez (version 1 of this: http://www.swiftech.com/MaelstromV2.aspx) and had it tucked in an area with basically no airflow and no heatsink. I chalked it up to user error, and moved on, but if I ever did a DDC again, I’d have it actively cooled with a big HSHehe, maybe some day
The two pumps used for the radiators will hang right underneath the reservoirs, which will hang on the side of the radiators.
The plan originally was to get some sort of plastic "hobby box" to install the PSU and Aquaero devices in, bolt that to the side of the case next to the radiators, and then mount the three additional pumps for the systems on top of it.
That worked in my head before I started measuring, but with the size of these radiators, that is obviously not going to fit. There is no space left next to the radiators (unless I go all the way down to the floor underneath them, but I don't want to do that).
The current revised plan in my head is to buy a large-ish PVC junction box from the electrical aisle at Home Depot. Something like this:
View attachment 3551
I could then use the C-channel metal bars left over from my initial failed plans (in previous posts) and attach those across the rear rails of the rack, and bolt this box to those bars.
It then attach the three remaining pumps to the lid of this thing. I think with the DDC's exposed to open air, they won't need much in the way of airflow over them to keep them cool, especially with all of the air moving near those radiators.
I'll of course have to cut some holes for ventilation, but I think it will wind up being pretty good.
As an added bonus, I could use actual electrical liquid-tight flexible conduit to route all of my wiring (power, fan speed control, pump speed control, etc.) for a nice clean look that aids in cable management.
At least that is my current thinking until I have a better idea.
So, I have always used D5 pumps, and by design they cool themselves with the fluid that passes through them, dumping it into the loop, but with like 22-25W each, we are talking like 125W if they are all at full speed. That's a not insignificant amount of added heat load to the loop.
Yes, these radiators are large and overkill, but I still want as much as possible of that capacity going towards cooling my components, not towards cooling my pumps.
There is little to no downside just having pumps that are air cooled avoiding dumping heat into the loop, and that's the reason for going with some DDC's.
DDC's have much lower flow rates than D5's though, so I figured, I'll use DDC's where flow rate is not likely to be critical (radiators and workstation) and keep D5's for where I really care about flow rate (CPU and GPU blocks for the game machine)
Zarathustra
Cloudless
- Joined
- Jun 19, 2019
- Messages
- 4,407
- Reaction score
- 4,753
The only pump I’ve ever burned out is a DDC. I had one in a swiftech bayrez (version 1 of this: http://www.swiftech.com/MaelstromV2.aspx) and had it tucked in an area with basically no airflow and no heatsink. I chalked it up to user error, and moved on, but if I ever did a DDC again, I’d have it actively cooled with a big HS
Yeah, I've never used a DDC before.
The pumps I bought do come with a heatsink. It's not very deep, but it is larger than I expected. In fact the whole dressed pump is larger than I expected.
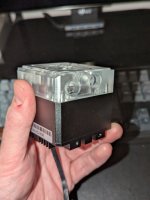
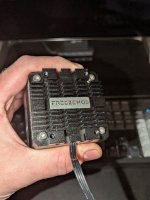
(For what it is worth I have large-ish hands)
My plan has been to open air mount them, figuring the heatsinks would do the job on their own.
I don't really want to add fans, but I could in a pinch. I guess I will see how hot they get in actual use, and make my decision based on that.
I’ve got an Ehiem 1250 that’s been working fine since 2003 in various loops, and several d5s, all of which still run. Only had the one bayrez ddc fail.I have a decades old D5 that I've been running in a pond off a solar panel for years.
Zarathustra
Cloudless
- Joined
- Jun 19, 2019
- Messages
- 4,407
- Reaction score
- 4,753
I've run into another momentary setback.
I determined that ideally I should make my own fan cables for things to be clean and the right length.
Initially, since I have so many unused Noctua extension cables from the boxes and boxes of Noctua fans I have bought, the plan was to just lop off the existing fan connectors and solder them to my own cable (maybe using solder-seal joints) and then covering it all in one big heat shrink seal. It would have been a little janky, but I figured it would be making the best of what I have, so I don't have to buy crimpers, pins and make my own connectors.
I did some tolerance stack-up calculations - however - and I think that if I do this, there won't be enough space between the fan bracket and the radiator fins to fit the resultant bulky cables.
So I am going to have to invest in pins, connectors and crimpers. (Not sure if they use a specialty crimper, or if I can use my standard electrical strippers)
Going to have to do some research on what the right parts are, and what crimpers I need.
Edit:
Looks like I need the following parts:
Connector body: Molex 47054-1000, RS 720-5990*
Pins: Molex 47054-1000, RS 172-9178*
Still not sure if I need a specialty crimper though.
Edit:
*If you are coming across this later, I ordered the wrong parts a few times (for various reasons) but eventually got these connector housings, and these terminals.
Last edited:
Zarathustra
Cloudless
- Joined
- Jun 19, 2019
- Messages
- 4,407
- Reaction score
- 4,753
I'm having a surprisingly difficult time finding these parts from anywhere a normal human being (without a purchasing department, or a need for reels of 10's of thousands of parts) can purchase these without serious ripoff pricing.
Some seller on amazon has kits of them with 5 connectors and exactly 20 terminals for like $7 each, which is a crazy price considering these cost pennies a piece. (also, having only exactly the right amount of terminals is a bad idea, as I know I will break some as this is the first time I crimp these)
We used to have this electronics store in the greater Boston area named "You-Do-It Electronics". They were amazing. Think Radioshack back in the day, but like 100 times the size.

Unfortunately they closed their store a few months back. They had been operating since the 40's. It was a huge loss. I could probably have found these parts there at non-ripoff prices.
I think the problem is almost no one DIY's electronics anymore, and that is a crying shame. We live in a "buy a finished device, then throw it out and buy another" era.
If anyone has any recommendation on sourcing of these parts in 100 or less quantities at non-rip off prices that sell to consumers, I'd appreciate it.
Some seller on amazon has kits of them with 5 connectors and exactly 20 terminals for like $7 each, which is a crazy price considering these cost pennies a piece. (also, having only exactly the right amount of terminals is a bad idea, as I know I will break some as this is the first time I crimp these)
We used to have this electronics store in the greater Boston area named "You-Do-It Electronics". They were amazing. Think Radioshack back in the day, but like 100 times the size.

Unfortunately they closed their store a few months back. They had been operating since the 40's. It was a huge loss. I could probably have found these parts there at non-ripoff prices.
I think the problem is almost no one DIY's electronics anymore, and that is a crying shame. We live in a "buy a finished device, then throw it out and buy another" era.
If anyone has any recommendation on sourcing of these parts in 100 or less quantities at non-rip off prices that sell to consumers, I'd appreciate it.
Have you tried any ham radio supply stores? They are the last big DIY electronics market that I’m aware ofI'm having a surprisingly difficult time finding these parts from anywhere a normal human being (without a purchasing department, or a need for reels of 10's of thousands of parts) can purchase these without serious ripoff pricing.
Some seller on amazon has kits of them with 5 connectors and exactly 20 terminals for like $7 each, which is a crazy price considering these cost pennies a piece. (also, having only exactly the right amount of terminals is a bad idea, as I know I will break some as this is the first time I crimp these)
We used to have this electronics store in the greater Boston area named "You-Do-It Electronics". They were amazing. Think Radioshack back in the day, but like 100 times the size.
View attachment 3561
Unfortunately they closed their store a few months back. They had been operating since the 40's. It was a huge loss. I could probably have found these parts there at non-ripoff prices.
I think the problem is almost no one DIY's electronics anymore, and that is a crying shame. We live in a "buy a finished device, then throw it out and buy another" era.
If anyone has any recommendation on sourcing of these parts in 100 or less quantities at non-rip off prices that sell to consumers, I'd appreciate it.
Grimlakin
Forum Posting Supreme
- Joined
- Jun 24, 2019
- Messages
- 10,288
- Reaction score
- 6,687
I wouldn't be surprised if Microcenter could help (NOPE search for part shows motherboards)... what about Granger? if you know the parts you need.Have you tried any ham radio supply stores? They are the last big DIY electronics market that I’m aware of
They will sell in the quantity you need.
Brian_B
Forum Posting Supreme
- Joined
- May 28, 2019
- Messages
- 8,485
- Reaction score
- 7,192
Digikey and Mouser both used to allow private sales in smaller quantitiesI'm having a surprisingly difficult time finding these parts from anywhere a normal human being (without a purchasing department, or a need for reels of 10's of thousands of parts) can purchase these without serious ripoff pricing.
Some seller on amazon has kits of them with 5 connectors and exactly 20 terminals for like $7 each, which is a crazy price considering these cost pennies a piece. (also, having only exactly the right amount of terminals is a bad idea, as I know I will break some as this is the first time I crimp these)
We used to have this electronics store in the greater Boston area named "You-Do-It Electronics". They were amazing. Think Radioshack back in the day, but like 100 times the size.
View attachment 3561
Unfortunately they closed their store a few months back. They had been operating since the 40's. It was a huge loss. I could probably have found these parts there at non-ripoff prices.
I think the problem is almost no one DIY's electronics anymore, and that is a crying shame. We live in a "buy a finished device, then throw it out and buy another" era.
If anyone has any recommendation on sourcing of these parts in 100 or less quantities at non-rip off prices that sell to consumers, I'd appreciate it.
Zarathustra
Cloudless
- Joined
- Jun 19, 2019
- Messages
- 4,407
- Reaction score
- 4,753
I wouldn't be surprised if Microcenter could help (NOPE search for part shows motherboards)... what about Granger? if you know the parts you need.
They will sell in the quantity you need.
Digikey and Mouser both used to allow private sales in smaller quantities
Thank you both. I wound up ordering what I need (and some spares for practice) from DigiKey.
Zarathustra
Cloudless
- Joined
- Jun 19, 2019
- Messages
- 4,407
- Reaction score
- 4,753
The fan bracket has two boards on the back of it with headers for the fans.I thought the radiator had built in fan headers for easy wiring. Why aren't you using that?
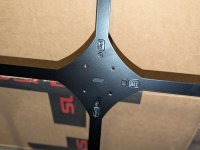
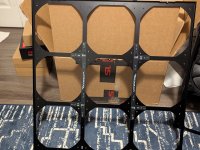
I am using those, but I still need to bring power and signal to those boards from my controllers, which is why I need cables.
If I were using Watercools controller boards, I could just install them in the radiator, and they come with the requisite cables, but I have three Aquaero 6 devices I love, and I have no desire to swap them out for anything else.
...so I have to make my own cables and and run them to my Aquaero's, which will be sitting in a box separate from the radiators.
Zarathustra
Cloudless
- Joined
- Jun 19, 2019
- Messages
- 4,407
- Reaction score
- 4,753
I could use a little bit more crimping advice, if anyone has any.
@Endgame , @Grimlakin, @Brian_B ? Anyone work with these before?
First off, bear with me, it's tough to take pictures of these tiny things (at least without breaking out the DSLR with the macro-lens, which I don't feel like doing right now)
So, the parts appear to be correct, but they come on this strip:
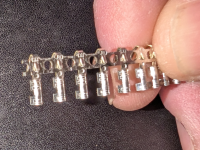
I've seen people just wiggle and break them off in the past, but then I get a terminal that looks like this, with "wings"
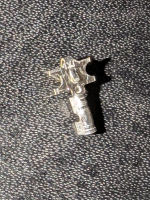
It's pretty clear that's not going to fit inside the connector body:
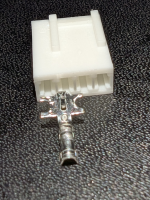
...but I didn't know what to do about them. Should I bend them into a square? Or wiggle them until they break off? Or snip them off with a cutting plier?
I removed the connector body from one of my many Noctua extensions for a reference of what they are supposed to look like when I am done:
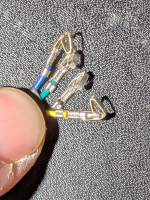
...and the terminals in that thing look nice and clean cut.
Now here's the problem.
I tried grabbing them with the very tip of my needle nosed pliers (which are huge by comparison) and bending them back and forth, hoping they were designed to break off at the right place, but that didn't do the trick. That wound up just destroying the terminal.
Then I tried snipping the wings off of the terminal with a cutting pliers to no avail. It just mashes the **** out of the entire thing. The comparative size of my cutting pliers to the size of the terminal are probably a contributing factor.
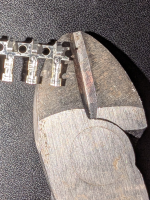
Any suggestions?
I've looked for videos on YouTube, but in every last crimping guide video, everyone seems to start with a clean terminal with nothing attached.
I presume in volume manufacturing they have some sort of automated equipmet that feeds the reel into it, and then die cuts the terminal out after (or during) the crimp, but that is a luxury I don't have.
1.) Are the smaller, sharper cutting pliers I should try?
2.) Do I have the wrong terminals? (I mean, they are the right one, but maybe I got the ones for automated assembly, not for manual crimping?
3.) Any other suggestions?
I'd appreciate any input from anyone with experience with these things.
@Endgame , @Grimlakin, @Brian_B ? Anyone work with these before?
First off, bear with me, it's tough to take pictures of these tiny things (at least without breaking out the DSLR with the macro-lens, which I don't feel like doing right now)
So, the parts appear to be correct, but they come on this strip:

I've seen people just wiggle and break them off in the past, but then I get a terminal that looks like this, with "wings"

It's pretty clear that's not going to fit inside the connector body:

...but I didn't know what to do about them. Should I bend them into a square? Or wiggle them until they break off? Or snip them off with a cutting plier?
I removed the connector body from one of my many Noctua extensions for a reference of what they are supposed to look like when I am done:

...and the terminals in that thing look nice and clean cut.
Now here's the problem.
I tried grabbing them with the very tip of my needle nosed pliers (which are huge by comparison) and bending them back and forth, hoping they were designed to break off at the right place, but that didn't do the trick. That wound up just destroying the terminal.
Then I tried snipping the wings off of the terminal with a cutting pliers to no avail. It just mashes the **** out of the entire thing. The comparative size of my cutting pliers to the size of the terminal are probably a contributing factor.

Any suggestions?
I've looked for videos on YouTube, but in every last crimping guide video, everyone seems to start with a clean terminal with nothing attached.
I presume in volume manufacturing they have some sort of automated equipmet that feeds the reel into it, and then die cuts the terminal out after (or during) the crimp, but that is a luxury I don't have.
1.) Are the smaller, sharper cutting pliers I should try?
2.) Do I have the wrong terminals? (I mean, they are the right one, but maybe I got the ones for automated assembly, not for manual crimping?
3.) Any other suggestions?
I'd appreciate any input from anyone with experience with these things.
Zarathustra
Cloudless
- Joined
- Jun 19, 2019
- Messages
- 4,407
- Reaction score
- 4,753
Grimlakin
Forum Posting Supreme
- Joined
- Jun 24, 2019
- Messages
- 10,288
- Reaction score
- 6,687
I think that would work. I was thinking a decent pair of nail clippers.
Zarathustra
Cloudless
- Joined
- Jun 19, 2019
- Messages
- 4,407
- Reaction score
- 4,753
2.) Do I have the wrong terminals? (I mean, they are the right one, but maybe I got the ones for automated assembly, not for manual crimping?
Reddit suggests this is the answer. That I should have bought "loose terminal" parts.
I'm going to have to search around for those.
Brian_B
Forum Posting Supreme
- Joined
- May 28, 2019
- Messages
- 8,485
- Reaction score
- 7,192
