The Z Build(s) 3.0 - Go Big and/or Go Home

After seemingly forever, googling, going in circles, I finally found a part number reference to the exact Molex part number for the loose terminals for these connectors, it is 0855102*. Digikey did not have them in stock, but Mouser did*!

I got $200 of them for $20. That should give me more than enough to learn from and mess up several.

They did have a warning on their site about shipping delays due to a backlog after a previous weather event, so who knows when I will actually get them. I think I'll have to move on to working on custom pump mounting while I wait for these to arrive.


Interesting side note:

Today I learned (from the Molex spec sheet) that Molex only rates these terminals for 25 insertions. I bet you never knew that about your fan connectors, huh?

Edit:
*If you are coming across this later, I ordered the wrong parts a few times (for various reasons) but eventually got these connector housings, and these terminals.
 
Last edited:
We used to call them dykes

I have a coworker that was called into HR. Working on wiring in an elevated rack and had a new hire working with him. Asked her to pass him they dykes. She got flustered... ended up calling an HR meeting. He was called in with his manager who asked what this was all about. His answer... Just watch.

So you called (name) a dyke? You know that isn't appropriate.

I understand but that's not what happened.

What do you mean?

It's the name of a tool. an angle cutter is called a Dyke.

Oh really and why is that?

Because it makes Diagonal cuts. Dikes.

HR, Ok... I understand. We will have to discuss this offline (shuffles away write up paperwork)

Manager: Thanks for your time....

Later... LAUGHTER FOR YEARS.

This reminds me of the strippers I keep in my basement.
 
So, progress has been a little bit slow lately, in part because I have been working on two parallel paths, and both have hit obstacles.

After seemingly forever, googling, going in circles, I finally found a part number reference to the exact Molex part number for the loose terminals for these connectors, it is 0855102. Digikey did not have them in stock, but Mouser did!

I got $200 of them for $20. That should give me more than enough to learn from and mess up several.

They did have a warning on their site about shipping delays due to a backlog after a previous weather event, so who knows when I will actually get them. I think I'll have to move on to working on custom pump mounting while I wait for these to arrive.


Interesting side note:

Today I learned (from the Molex spec sheet) that Molex only rates these terminals for 25 insertions. I bet you never knew that about your fan connectors, huh?

First we have the Molex fan connector terminal issue. I finally received the terminals I ordered above. Sadly they were not exactly what I was looking for.

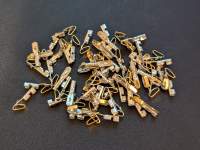
Don't get me wrong, they are the correct parts, and will work, and they no longer have the wings, but I didn't realize that I accidentally ordered the gold plated variety.

1740274718623.png

austin-powers-i-love-gold.gif


My understanding is that it is not a great idea to mix gold plated and tin plated terminals in contact with eachother, as the gold has a nasty habit of - through what is called "tin fretting" degrading, flaking off, and leaving you with a poor connection.

I don't know a whole lot about it, but I presume it is some sort of galvanic effect.

Every fan header I have ever seen is tin, not gold, so it would make sense that I do my best to get a hold of the tin versions of the terminals.

For a while there I was thinking it wasn't going to be possible. I found one Molex part number, but the minimum order quantity everywhere I looked was 96,000 pieces. (just a little bit more than I need)

But then eventually I found an equivalent loose part number that was in stock at Mouser and ordered them. So now we wait... again...
 
Alright, the second path has been working out how to mount the reservoirs and pumps to the sides of the radiators.

After initially deciding to make my own bracket, and then later changing my mind and ordering Watercool's reservoir brackets, I am now back to making my own, because of the issue I previously mentioned where they sat a bit too high for my tastes.

I bought a 24" long 1/4" sheet of ABS, that I had planned on cutting into strips (70mm wide) to run the length of the side of the radiators, for me to cut custom holes in and mount my stuff.

I didn't want to make a mess indoors cutting though, so the plan was to do it outside, but we had a slushy messy ice storm followed by a week during which the temperatures never climbed above freezing, and I didn't want to work outside in 10°F weather, so I waited.

Today it was a balmy 30°F out, so I decided it was time.

One thing I have learned over the years of tinkering and trying to make stuff, is that even if you have steady hands, it can be surprisingly difficult to cut straight lines linger than what you can do with a single move of a miter saw blade.

If I had a band saw with a backstop, that would be amazing, but sadly middle school shop class lied to me about the tools I was likely to have at my ready disposal in my life.

If you use a jigsaw hand or powered, it becomes squiggly and uneven no matter what you do.

I was going to have to make do with my circular saw. Just for good measure, I went to Harbor Freight and picked up a blade intended for cutting plastics, as I wasn't convinced my wood blade was going to make a clean cut. (something to do with rotational speeds and number of teeth)

To get a straight cut, I decided to do it like I would ripping a plank along the grain, and clamped down a known straight piece of wood, and measured my cut distance to that, with the plan of running the side of the circular saw along it.

It was a pain in the but to get both sides precisely aligned, as I would first align one, and then move to the other side, and my adjustments on the other side caused the first side to move, etc. etc.

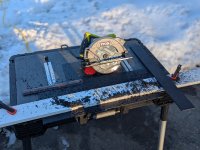
Eventually I got it dialed in, and it was time to cut:

PXL_20250222_214527687.PORTRAIT.jpg

PXL_20250222_212455042.PORTRAIT.jpg

I was dreading this a little, but it actually wound up turning out pretty good.

The width of the two pieces wound up being more repeatable than it had any right to be (within a millimeter).

While I was having some success, I decided to also cut a third piece, and then chop it into 8 squares to use as spacers or something, when I go to assemble it all, if I need them.

1740276911953.png

At least that is a little bit of progress :p
 
Alright, please forgive the silence here.

This past weekend was my baby sisters wedding shower, and I was volunteered to help entertain the men while the women did their thing.

After that I was sick as a dog. So not much progress.

But, I was hell bent on making at least a little bit of progress without the weekend completely disappearing.

I remembered that I had bought an AMD RX 7600 (non-xt) on eBay to go into the workstation once I pull the 4090. I also remembered that I had done that in January. Whoops. More than 30 days had past, and I hadn't tested it yet to make sure it was in working order. Rookie eBay mistake...

The one I bought was an OEM part out of a Lenovo "Gaming Desktop". It looks like someone bought large quantities of these Lenovo "gaming desktops", pulled all of the GPU's, upgraded them and sold them, so they had like 200 of these RX7600's in essentially new, never used condition for sale. I made a half-lowball offer, and - surprisingly - got it.

While I do frequently buy used Enterprise equipment from decommissioned servers on eBay, I don't normally buy consumer hardware there. Usually it has been abused, and the seller is some kid who knows nothing about ESD bags or filling a package with packing materials. I decided to make an exception as this appeared to be a high volume seller, with good reviews, and I got the feeling they knew what they were doing.

So, my 30 day buyer protection was now up, and I hadn't gotten around to testing it yet.

I popped it into the testbench machine (this is one of the reason I have a testbench machine, to test hardware without having to pull apart my main machine). I got a BIOS splash logo, but then nothing. No text output during post, no BIOS, no display output in either Linux or Windows.

Oh oh.

But then I thought, you know, my testbench uses not only old (Ivy Bridge era) hardware, but also Server hardware. This is so far outside of what an RX 7600 would have been validated on to be silly. Maybe I should test it on newer hardware. But I didn't want to break into the workstation, and I have given away a bunch of my newer and more usable hardware lately, so I didn't have many options.

I pulled out my old Sandy Bridge era i7-3930k and Asus p9x79 motherboard and hooked it up open air for some testing.

This one was worse than the previous one. No image output at all aty any time. Not even a splash screen.

Starting to get more worried that I had been scammed (or at least sent a defective part, that I now would not be able to do anything about)

I decided I needed to test it in something newer. I knew I had a Coffee Lake i5-9500 I had used in an HTPC at one point somewhere, but I couldn't find it. (it must be in a box buried somewhere). So I sighed, and decided I was going to have to test it on the actual workstation.

I'm glad that I decided to build my current build with Koolance QDC's, because that allowed me to pop out the water cooled 4090, pre-fill a length of tubing with two QDC's on it to bypass the GPU and keep the water flowing, and then install the GPU in the desktop.


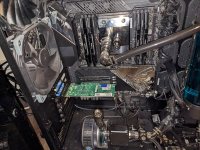
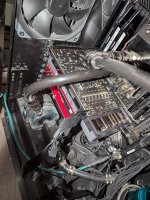
Apparently I forgot to take before pics, so here is what it looked like a couple of years ago when I removed my old 6900xt:


6900xt installed:
PXL_20230130_204954891.jpg

6900xt removed:
PXL_20230130_205519200.jpg

GPU bypass and 7600xt installed:
PXL_20250302_231553331.jpg

(Apparently it got a little dusty in there when I did my heat pump project last year, and I never noticed. Whoops. I guess that is a risk when you stick the case out of sight in another room.... I'd freak out, and give it a good blow out, but I am going to disassemble the whole thing pretty soon anyway. Everything will get a thorough clean before being put in the rack or put into storage anyway)

Anyway, long story short, it was a success!

In the TRX40 Threadripper board, it fired right up with out any issue and worked as expected.

My conclusion is that AMD's 7000 series GPU's just don't like older systems very much. Not sure what the incompatibility is, but it is real.

I have decided to just leave the 7600xt in the system until the changeover. I'm not going to have time for any big heavy games before then anyway, and if I am going to have any issues with it, I might as well learn about (and do something about) them now.
 
Alright, please forgive the silence here.

This past weekend was my baby sisters wedding shower, and I was volunteered to help entertain the men while the women did their thing.

After that I was sick as a dog. So not much progress.

But, I was hell bent on making at least a little bit of progress without the weekend completely disappearing.

I remembered that I had bought an AMD RX 7600 (non-xt) on eBay to go into the workstation once I pull the 4090. I also remembered that I had done that in January. Whoops. More than 30 days had past, and I hadn't tested it yet to make sure it was in working order. Rookie eBay mistake...

The one I bought was an OEM part out of a Lenovo "Gaming Desktop". It looks like someone bought large quantities of these Lenovo "gaming desktops", pulled all of the GPU's, upgraded them and sold them, so they had like 200 of these RX7600's in essentially new, never used condition for sale. I made a half-lowball offer, and - surprisingly - got it.

While I do frequently buy used Enterprise equipment from decommissioned servers on eBay, I don't normally buy consumer hardware there. Usually it has been abused, and the seller is some kid who knows nothing about ESD bags or filling a package with packing materials. I decided to make an exception as this appeared to be a high volume seller, with good reviews, and I got the feeling they knew what they were doing.

So, my 30 day buyer protection was now up, and I hadn't gotten around to testing it yet.

I popped it into the testbench machine (this is one of the reason I have a testbench machine, to test hardware without having to pull apart my main machine). I got a BIOS splash logo, but then nothing. No text output during post, no BIOS, no display output in either Linux or Windows.

Oh oh.

But then I thought, you know, my testbench uses not only old (Ivy Bridge era) hardware, but also Server hardware. This is so far outside of what an RX 7600 would have been validated on to be silly. Maybe I should test it on newer hardware. But I didn't want to break into the workstation, and I have given away a bunch of my newer and more usable hardware lately, so I didn't have many options.

I pulled out my old Sandy Bridge era i7-3930k and Asus p9x79 motherboard and hooked it up open air for some testing.

This one was worse than the previous one. No image output at all aty any time. Not even a splash screen.

Starting to get more worried that I had been scammed (or at least sent a defective part, that I now would not be able to do anything about)

I decided I needed to test it in something newer. I knew I had a Coffee Lake i5-9500 I had used in an HTPC at one point somewhere, but I couldn't find it. (it must be in a box buried somewhere). So I sighed, and decided I was going to have to test it on the actual workstation.

I'm glad that I decided to build my current build with Koolance QDC's, because that allowed me to pop out the water cooled 4090, pre-fill a length of tubing with two QDC's on it to bypass the GPU and keep the water flowing, and then install the GPU in the desktop.


Apparently I forgot to take before pics, so here is what it looked like a couple of years ago when I removed my old 6900xt:


6900xt installed:
View attachment 3597

6900xt removed:
View attachment 3598

GPU bypass and 7600xt installed:
View attachment 3599

(Apparently it got a little dusty in there when I did my heat pump project last year, and I never noticed. Whoops. I guess that is a risk when you stick the case out of sight in another room.... I'd freak out, and give it a good blow out, but I am going to disassemble the whole thing pretty soon anyway. Everything will get a thorough clean before being put in the rack or put into storage anyway)

Anyway, long story short, it was a success!

In the TRX40 Threadripper board, it fired right up with out any issue and worked as expected.

My conclusion is that AMD's 7000 series GPU's just don't like older systems very much. Not sure what the incompatibility is, but it is real.

I have decided to just leave the 7600xt in the system until the changeover. I'm not going to have time for any big heavy games before then anyway, and if I am going to have any issues with it, I might as well learn about (and do something about) them now.


As a side note, I am really liking this little RX 7600.

I mean, it's no 4090, but it sips power and on the desktop it is every bit as snappy as the 4090.

In Linux, I think it may even snappier than the 4090. It feels especially responsive when using my Windows 10 Virtualbox VM under Linux. Maybe due to AMD's excellent Linux open source drivers.

Back in the day I used to always buy Nvidia because of their excellent binary blob Linux drivers, while AMD's Linux drivers were trash. It's funny how things change.

For ****s and giggles I did some RX 7600 performance testing.

If anyone is curious:

RX 7600 Time Spy: 10527 overall score, 10362 graphics score.

RX 7600 Time Spy Extreme: 5395 overall score, 4962 graphics score.

RX 7600 Port Royal: Score: 5449

I also did some testing in Civilization 6 - Gathering Storm.

I normally run that game at ~120fps at 4k native, with all settings maxed on the 4090.

The late game canned benchmark was a little slow, but once I reduced MSAA 8x down to MSAA 2x, the game runs great at 4k on the RX 7600. Civ 6 Gathering Storm is totally playable. ( I probably wouldn't enjoy most more modern titles on it at 4K though.)

But since this is my workstation, and only rarely intended to be used for games, that is not a problem at all.
Interestingly enough, another difference I have noticed in going from the 4090 to the RX 7600 is a big quality of life improvement, at least in Linux.

With the 4090, since I use an LG OLED TV as my monitor, whenever the screens were asleep, I'd have to be careful to turn on the TV using the remote first, and then wait until it fully starts up. Only once fully started could I jiggle the mouse to wake it up. If I jiggled the mouse too soon, the TV would never be detected, and would sit there with no input, and once that happened, nothing would help, other than unplugging the HDMI cable and plugging it back in again. A huge annoyance.

This is not the case with the RX7600 at all. The TV is always detected once it wakes up, and I never have to worry about accidentally waking the screens before the TV is done "booting".

I can't remember if this happened in Windows or not. I usually only use WIndows for games, so I boot it up, start up my game, play it and shut it down again. Rarely is it sitting booted with screens asleep in Windows.
 
There is a LG TV Companion app on github for windows that connects to the TV's IP address. Powers it on, wakes it up, shuts it down all of that like it was a vesa responsive monitor. It's REALLY nice.
 
There is a LG TV Companion app on github for windows that connects to the TV's IP address. Powers it on, wakes it up, shuts it down all of that like it was a vesa responsive monitor. It's REALLY nice.

Interesting. I'll have to look into that. I had not heard of it.

I usually don't connect my TV to the internet though. It is only used as a monitor.

Maybe if I firewall it off from the WAN, and just connect via local IP it is fine.
 
It works like a freaking charm to be honest. I use it on my LG C3.
 
Alright, the second path has been working out how to mount the reservoirs and pumps to the sides of the radiators.

After initially deciding to make my own bracket, and then later changing my mind and ordering Watercool's reservoir brackets, I am now back to making my own, because of the issue I previously mentioned where they sat a bit too high for my tastes.

I bought a 24" long 1/4" sheet of ABS, that I had planned on cutting into strips (70mm wide) to run the length of the side of the radiators, for me to cut custom holes in and mount my stuff.

I didn't want to make a mess indoors cutting though, so the plan was to do it outside, but we had a slushy messy ice storm followed by a week during which the temperatures never climbed above freezing, and I didn't want to work outside in 10°F weather, so I waited.

Today it was a balmy 30°F out, so I decided it was time.

One thing I have learned over the years of tinkering and trying to make stuff, is that even if you have steady hands, it can be surprisingly difficult to cut straight lines linger than what you can do with a single move of a miter saw blade.

If I had a band saw with a backstop, that would be amazing, but sadly middle school shop class lied to me about the tools I was likely to have at my ready disposal in my life.

If you use a jigsaw hand or powered, it becomes squiggly and uneven no matter what you do.

I was going to have to make do with my circular saw. Just for good measure, I went to Harbor Freight and picked up a blade intended for cutting plastics, as I wasn't convinced my wood blade was going to make a clean cut. (something to do with rotational speeds and number of teeth)

To get a straight cut, I decided to do it like I would ripping a plank along the grain, and clamped down a known straight piece of wood, and measured my cut distance to that, with the plan of running the side of the circular saw along it.

It was a pain in the but to get both sides precisely aligned, as I would first align one, and then move to the other side, and my adjustments on the other side caused the first side to move, etc. etc.

Eventually I got it dialed in, and it was time to cut:

View attachment 3576

View attachment 3577

I was dreading this a little, but it actually wound up turning out pretty good.

The width of the two pieces wound up being more repeatable than it had any right to be (within a millimeter).

While I was having some success, I decided to also cut a third piece, and then chop it into 8 squares to use as spacers or something, when I go to assemble it all, if I need them.

View attachment 3578

At least that is a little bit of progress :p

Alrighty, here's a little bit of progress.

I'm actually a little embarrassed how much time this took me, but it has been a game of trial and error, and then one of repeated assembly and disassembly to see if the hole I just made lines up and everything fits, only to do this over and over and over again

So I used the strips of ABS I cut last week to put together my first reservoir/pump bracket.

Now, these were supposed to be enough for both of them, but it didn't turn out that way.

The original plan was to attach one strip to each radiator using the screw holes present in them (four M4's, one M3 and and another M3 for a little alignment feature, which is quite nice. At least I think those are the measurements on the screws. Not 100% on that. I just pulled my screws out of my metric machine screw kit, and used the ones that fit.

01_single_first.jpg

But I ran into a little issue. (Or at least a refinement of my plan in my head as the project is underway.

The pumps I am using have the ability to use an inlet on top, and an outlet 90 degrees to the side (or both inlet and outlet on the side). In the interest of making each radiator loop as short and limited in bends as possible, I thought it would be best to use the top inlet, and the side outlet going straight into the radiator using a rotary male-to-male fitting.

Only one issue. That makes the pump stick out too much. (seen here with my first failed pump spacer bracket experiment. My smallest hole saw - 1" - was too big)

02_pump_stick_out.jpg

And seeing that the G1/4 threads are straight into the plexi, I didn't feel comfortable having all of the weight hanging on that lever arm. It just seems like a crack risk waiting to happen.

Additionally, the big hole is there to allow for cable routing. I plan on attaching a 1" liquid-tight conduit there. (It doesn't need to be waterproof. I just want to use it for cable management.) But there really isn't much space between the bracket and those pipes. Not even sure the threads of the liquid-tight fitting could be able to mount there without interfering with them, so I wanted to add another layer there too.

So I decided to go fro a three layer design. Base layer attaches to the radiator, and also gets some pressed in threaded inserts to help attach the radiator and pump. Second layer is smaller than the base layer, and sits on top of it, acting as a lid for some of the larger holes, gets a hole designed for the liquid-tight fitting, and acts as a spacer for the pump bracket.

For threaded inserts, I tried these in a 6-32, UNC size. They are specifically designed for plastic. No heat or ultrasonic necessary. You just drill a 3/16ths hole, and press them in. First time you put a screw in them, they expand to sit extremely tight in the hole.

Here is a test piece I inserted one in to make sure it worked well before possibly butchering my main bracket pieces.

03_threaded_insert.jpg

I get the impression there is a specialty tool to press them in, but I don't have it. I tried a few methods to press them in, including my benchtop vise on my workbench (worked, but overkill) a screw style wood clamp with pieces of wood on either side (annoying, too many loose pieces) and finally, just pressing it in with a channel lock. This was easy, and just worked.

The first time you screw a screw into one of these to expand it, it is really tight. The friction actually makes both the screw and the insert very hot. So I just grabbed the longest 6-32 UNC screw I could find (only like 2") and screwed it all the way in and out several times in a row. The parts got nice and hot. My thought process is that this softens the plastic and re-hardens it around the insert. No idea if that is actually true or not, but I figured it was worth trying.

Here are the three layers attached to the radiator:


04_three_layer_burrito.jpg


For what it is worth, this is a work in progress. I'm not even bothering wiping down figerprints or smudges until it is all done, and I take the final pics. I'm going to touch these things a million times, and that is going to happen.

While installing the pump is a real pain (I'm sure auto mechanics would call it a real engineers special) It does work, and everything fits. Time to drill holes for the reservoir, and press in some more inserts.

Here are the thee finished layers:

05_layers.jpg


They are full of classic "early prototype jank", but most of that is hidden when installed, so who cares? :p


Here is a closeup on the pump mount.

06_pump_closeup.jpg


Here we have the reservoir attached:

07_with_res.jpg


Here's where the tubes from the res to the pump will go. I hope they don't interfere with the conduit too much...

08_tube_location.jpg

There is more space up top in this configuration than what was originally planned. I might even fit the QDC's now, but I am not sure I want to anymore. I'm not sure how much flow restriction the Koolance QD4's actually add, and I don't want to slow down the flow...

09_more_space_up_top.jpg

Oh, and here is the conduit fitting. We will have to see how much interference between the tubing and the conduit there winds up being.

10_conduit_fitting.jpg


I am not attaching any tubing yet, as I wound up having to order more ABS to make the second bracket, and when it gets here, I am going to disassemble the whole thing again, and use the existing parts as templates for the second bracket, so it is going to need to be completely disassembled yet again...

Anyway, I was happy to finally get through the design of the bracket.
 
Looks like I should have bought the Motherboard for phase 2 (the game system) while I could.

I have only been able to find two x870 or x870e motherboards that have two Ethernet ports and at least one of them is 10gig.

The Asus ProArt X870E (1x 10gig + 1x 2.5gig) and the Gigabyte AI Top (2x 10gig)

The Asus ProArt board has been out of stock for months.

The Gigabyte AI TOP was available at an obscene $799 when I started this, but since then it has been subject to retailer scalping. I can only find it at over $1200 now. I didn't want to pay the $799 original price tag, and I am sure as hell not going to pay over $1200 for it.

Plan B was to find a motherboard with just a single 10gig port, and add in a cheap gigabit or multigig nic in a chipset PCIe slot. Boards with a single 10gig slot are also either unavailable, or only have two PCIe slots (and if you use both, the primary drops down to 8x.)

It may have to be Plan C I go with then. A board with a more normal single multigig NIC on board, and an available minimum of 4x slot off of the chipset (that does not drop the primary PCIe slot down) that can be used for a 10gig NIC. There aren't too many available boards with 4x chipset slots, but there are some. The MSI x870e Carbon (I'm tempted to call it al carbon. Mmm Tacos) seems like it might be a decent option here. the Gigabyte x870e Aorus Master might be another one. While being just under $500 didn't used to seem like a good deal, by comparison, maybe it is. Going to continue poking around and seeing what else I can find.

This used to not be possible. At least not affordably. All of the 10gig NIC's I could easily get my hands on were decommed server NIC's, and thus required 8x Gen2 slots. In my experience, while 4x Gen2 should be more than enough bandwidth for a single 10Gig port, at least the intel NIC's I've used that were 8x Gen2 in the past behaved very very strange when given anyhting less than 8x lanes.

It looks like there are a handful of options now for 4x Gen3+ cards now. Most of them seem based on the Aquantia AQ107 chip. I have never used an Aquantia NIC. Hopefully they work well.

Edit:

Hmm.

I just realized something.

If I am going to use the 3U Sliger case with the sideways mount GPU (like I was planning in order to make the GPU fit), I'm not sure how easy it will be to use these other PCie slots, as the GPU will pretty much block them all.

1741893690584.png


it looks like there is only one upright slot, and it is in the location where I'd expect to find the primary GPU slot, meaning, it will be blocked by the riser connector...

Unless - since my GPU with water block is now two slot, I get yet another riser, and try to mount it sideways as well right next to the GPU. That might be a little sketchy...

I may have to hold out for other motherboards or rethink my case strategy and go with something 5U or taller so the GPU can fit standing up...
 
Last edited:
5u+ cases aren't exactly super common or cheap either. Silverstone has a few, but they are ridiculously expensive.

I'm not familiar with RackChoice, but they have one that is not terribly priced that may meet my needs.

It's probably better to not have to deal with the complications from a riser anyway, especially as GPU's start getting into Gen5 speeds where signal issues become more and more difficult...

Of course it throws off my rack spacing plan, and may require me to move things again, but can't do much about that... I should still be able to fit a 5U and 4U cases where I had intended to fit the 4U and 3U cases, but there won't be any spacing between them, so it will be a little less flexible.
 
Another weekend, another limited amount of progress.

I spent some time trying to duplicate my brackets for the second radiator. No pics here. There is nothing new to show off, and I have a little bit of trimming left to do before it will work just right, and I ran out of daylight before i got that done...

I'll say this. I'm an engineer. I am pretty good at being an engineer. But there is a difference between designing a place for a hole on a drawing, and actually making that hole.

I've always had a lot of respect for good fabricators/machinists. I am not one of those. This project has only reinforced my respect for those who are good at it.

So, I am not quite yet at the level of "manufacturing maturity" to be able to claim that I can make "replaceable parts". Each of these two brackets required significant fine tuning to get them to work, and replacing one of the layers with one from the other bracket would result in them just not fitting at all. :rolleyes:


I also spent some time working on the C-channels I had originally bought to reinforce the side panel (which ultimately wound up being unnecessary).

I am re-using them as mounting bars for the box that will contain the fan controllers, power supply (and possibly some pumps).

I wound up cutting them down to 19" and then marked the cage nut holes on them:

1742185449408.jpeg

Then I went to drill the holes using my old ****ty drill press.

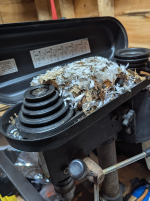
Last winter I had a mouse move in to my shed where I have my main workbench. I eventually wound up killing it with bait. I knew it built a nest in there somewhere, but I just couldn't find it. Well, I found it today:
1742185473467.png

The little ****er was living inside of the top of my drill press. Got to hand it to him (or her, no idea) that was a pretty protected space. At least until someone went to turn on the drill press.

So, anyway, brief break to stop, clean out the top of the drill press and inspect for any chew marks or other damage, and then I drilled the holes.

I measured the screws that go into the cage nuts on the rack. They all seem to be 1/4". In order to give myself a little tolerance to play with and make everything fit, I decided to go up a size to 3/8".

This wound up looking pretty good:

1742185530592.jpeg

And of course, I had to do a test fit on the back of the rack, to make sure they will work:

1742185547435.jpeg

More to come...


I also did some thinking. Phase 1 of this project is to just move the workstation into the rack, but phase 2 involves building the new game machine.

My local MicroCenter has both 9800x3d's and 9950x3d's in stock now. They also have the motherboard I think I have settled on for that build. The MSI x870e MAG Tomahawk.

I have decided on this one because it both has a 4x PCIe slot off the chipset I can use for a 10gig NIC and it is one of the few x870 or x870e motherboards that allow you to disable the 40Gbit USB ports and instead use those 4x Gen5 lanes off the CPU for a second CPU connected m.2 port.

I don't know if power stages and overclocking capability is any good (or if that stuff even matters anymore these days) but it seems like it is in the direction of what I want.

Thing is, this is not an official MicroCenter bundle. But the last time I bought a bundle from MicroCenter, they allowed me to customize it a bit and still gave me a bundle discount. I'm going to see if they let me do that with these.

Things I am not yet settled on:

9800x3d vs 9950x3d:

They seem to trade blows in games, which makes me think that the cheaper one (9800x3d) would be the smartest choice. That said, I could get a 9950x3d and just disable the non-X3d CCD, and essentially get a higher clocked (5.7ghz vs. 5.5Ghz ) 9800x3d.... And this would give me more flexibility. If I ever need to use it for anything that requires more cores, I can just enable them again...

In the past I wouldn't have cared this much about the CPU as I game at 4k, but the title I want to enjoy when this is all done is Stalker2, and it is crazy heavy on the CPU. If I don't wan' to use frame gen (which I don't) even the 9950x3d may not avoid minimum drops under 60fps. I generally see the 9800xrd getting better average frame rates, but the 9950x3d often gets better 0.1% minimums, which might be significant.

The 9950x3d is - of course - about $200 more expensive, but after the money I am dumping into this project, what's another $200? CPU's just aren't the significant part of a build (cost wise) like they once were...

Which RAM to buy:
I want to try for DDR5-6400 with a 1:1 MCLK:UCLK ratio, but this will involve a mild overclock of the uncore parts of the chip, which may or may not work based on silicon lottery.

I might just go with DDR5-6000 CL30, and try tho overclock it up there, instead of just trying to buy DDR5-6400 directly (in case the uncore overclock fails) Not sure.

Also not sure how much I need. I haven't thought much about RAM use in games for a long time. My workstation has had 64GB in it since 2014, so I am not even sure how much RAM a game-centric machine might need.

16GB is probably a bare minimum in 2025, but you can't even buy 8GB modules in DDR5. 32GB (2x16) is probably the standard recommendation right now. Not sure if I want to step it up to 48GB (2x24) especially if that makes me sacrifice latency.

Anyway, the reason I mention this is, I am not quite ready for phase 2 yet, and I am reticent about buying things too early and then not having a chance to test them before my return window (15 days at MicroCenter) closes. But on the flip side, it would really suck if by the time I got to phase 2, they were sold out...

So, I have some thinking to do about which RAM and which CPU I want, but I may just drive to MicroCenter and do a defensive Phase 2 buy in the next few days.

Appreciate anyones thoughts on the choices above.
 
I would say 64 gig for your gaming box should be perfectly fine. 32 is starting to be required for the most demanding of games.
 
Become a Patron!
Back
Top